Wednesday 15 February 2017


 Refering to my post from 16.april 2015 about Microantriebe/KK Producja:

Last week I received a package form KK Producja. I was impressed not only about the fine products, but also of the very clever and safe packageing. First an envelope with inside air bubble plastic sheet.
Then a  wellpaper box, then platic bags for each part, and inside this a laser cut veneer made to fit the part, again wrapped in clear tape.

See picture.

Also I had a very good contact/conversation with the firm in advance of the ordering/delivery. This firm have so many interesting products for us small scale modellers. Good to find they have improved in their earlier weak sides (in my experience), communication with the customers.

http://www.mikroantriebe.de/ 

http://www.shop.kkpmo.com/login.php?language=en


Friday 16 October 2015

Update oktober 2015


For the little NSB type IV I have received four drivers and a cab with sidetanks 3D printed in high detail stainless steel from Imaterialise. The wheels (without rims) but with integral half axle came out quite well. The turned steel wheel rims in the picture I have already pushed onto the wheels. These rims are from THE 2MM Scale Association (2MMSA). They where pressfitted from the back onto the wheels with handforce.

                 Size compared to 1 Euro

Price for 3D print of a set of 4 wheels was  Euro 19.79/ £ 14.64.
With the steelrims the tota price become:  E 23.84/£ 17.64
2 pair of 2MMSA 7mm dia drivers is E 18.90£14.00

Comparison with 7mm DIA coach wheel (left)and 7mm DIA driver (right) from the 2MMSA


 I have also received from Shapeways a set of wheels from the same stl. file. This time in Frosted Extreme Detail plastic. Of cause plastic half axle may not be so good, but for a stand model its okay and I wanted to compare with the steel ones. The cost for the set shown without steel rims was: E 10.76/ £ 7.96
                                                         

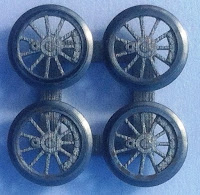
Steel wheels with steel rim attached
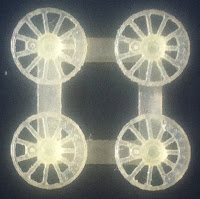
Plastic
As you can see from the photos the degree of detail and fineness is about equal between steel and plastic. Further development of the plastic solution could be to have steel axles and steel rims. But to assemble three part and get a wobblefree wheel is a real challenge! Pickup would then be from the steel rims and therefore not really suited to split frame pickup from the axle.

I will go further with the steel version for this project. I have two ideas:
1.
Use separate wheel rims turned in steel from 2MMSA. I will ask them to make a version where the little flange that keep the wheel in the right position is made on the inside and not on the outside.. The 1mm integral half axle, I will increase to 1.5mm and turn it down to 1mm for accuracy.
2.
Alter the STL. file to incorporate the flange a little over scale and then turn it down to the right profile.  The 1mm integral half axle, I will also here increase to 1.5mm and turn it down to 1mm for accuracy.
                                                                                                     
So to the  cab/sidetanks:

Imaterialise warned me that this may not work out well because of thin walls and the general shape. They where right:

They were able to produce the thin wall (0.3mm) but the model wharped in the prosess. If I shall go furter with this I will try thicker walls and put in preliminary reinforces like closing the cabsides and connect the two sidetanks. By using tabs to connect , It should be easy to cut off the reinforcements.


Comparison with 1 EURO


Silhouette makes the warping evident

The steps from the cab came separate.


To conclude this, I also ordered a plastic version from Shapeways, but they refused the design. I prefer the metall version because I need all the weight I can get for traction. Therfore I will continue developing the metal version or go back to etching this part


Thursday 16 April 2015


 My NSB type IV has come a little further. The correct gearwheels from Mikroantriebe are placed in position temporarely on the picture. Aksles have to be made and he two compensation plates (see blog 25 Mars 2010) must be made. I have some 0.25mm PCB that need to be etched. It has no photoresiston it so I have to cover it myself. I try to find the spray called Positiv 20 but I heard its out of the market. Does anyone know a source for this? The wheels in the picture are 7mm finescale (tender?) wheels from 2MMSA. These are an option, but first I will try 3D printing in high detail stainless steel with integral 1mm axle for split frame. These will fit steel wheelrims from 2MMSA
The motor is from China and is Ø5mm. The Trancend memory stick is 12x37mm


About Mikroantriebe
They have for some years produced the gears in Poland. New name is KK Podukcja Mikroantriebe

http://www.shop.kkpmo.com/

The unike about this firm (to my knowledge) is that they have a complete program of gears from module 0.1 and up to module 0.5 in brass and Polyacetal POM (nylonlike) And a lot of other useful parts for micro models.

But I have had problems with getting answers from them when I tried to trace a missing delivery of gears I had ordered (It was not their fault). So I now wonder: Are the firm still out there? I hope so.


Tuesday 6 January 2015

 Happy new year to all!


Being in the Norwegian wood for a while, I`m out!


After mixed experience with etching, I got interested in 3D printing. This have resulted in a few new parts for my Rena 1900 project: steam NG loco NSB type IV in N finescale 1:160.  But designing for 3D printing have given me some frustrations also. I use Sketchup for designing the 3D files. For a while I have struggled with a drawing comprising the cab and sidetanks. I plan to print it in high detail steel or brass for weight. So far I have not been able to refine the drawing into STL format which is required by the printing companies. I now think all the tiny boltheads may be the problem. But I have succeded to have some other parts 3D printed. Its the splitframes printed in brass and a soldering fixture for holding etched parts together while soldering. This as an alternative for 3D printing the cab and sidetanks. The turned brass boiler in the picture is ok, but I like to try 3D printing also this. Afterall, I need several of those locos. The motor is a 5mm Ø pagermotor that I was lucky to obtain from China. It slides snugly into the boiler. The picture shows the leads popping out of the boiler tube in the front.

The two frame halves compared in size to a 1EURO coin

The soldering mal
With the turned boilertube

Sunday 4 November 2012

Maybe better?


Today I tested a new green mix and sprinkled on more sparingly on another tree I made today. This improved the appearance as may be evident in the picture below. 


By twisting separate branches I can make small saplings growing around the mother tree.

Saturday 3 November 2012

Trees again

After almost a year of silence , I like to tell about some experiments with making spruce trees for my Rena 1900 project. I may go into more detail later, but for now I have uploaded some pictures. I make the branches by etching and use a wooden tapered stick for the trunk. The branches are glued to the trunk and then all is airbrushed brownish grey. Then I spray  with 3M spray mount and sprincle some fine ground foam. In the second picture I have used a photo of real trees as a background. I liked the result reasonable well, but after this test I see many improvement possibilities for making the trees faster and more airy.


Wednesday 16 November 2011

More buildings


It has been a long time since last posting.
I have, when time permits me, worked out dawings for the group of  houses on this picture
(photo Thor Bjerke)
It is a house originally built for four lenghtsmen (=line inspectors, see earlier posting of the plan) with their families and with a shed and a cow barn (left). The cow barn was on the heritage list, but a few years back all three houses were demolished. The lenghtsmens house is built of machined wood log and after some decades, hevily rebuilt and covered with plastering on the facades. Typical for some houses in the area, but still unusual onto logs.


I found this drawing in the archives of ROM Eiendom (former part of NSB), and from the railway museum this photo from the station Rasta further up the line:


It shows the building plastered and with built-in staircases. Originally the staircases were to my opinion open like in my reconstruction:


Next task is to decide on how to build the model. Lasercut card will have problems to define the corners properly. Maybe a thin etch (0.1mm or 0.15mm) overlay over plasticard?. A bit of wood grain can be scraped into the surface with a stiff steel brush after etching, (maybe). Or handmade in plasticard. Difficult corners again. Same with wood/veneer. Like to hear comments on this. Windows, doors and railings  is best etched or lasered.
Oh, ...Yes there are dragonheads topping the apex